Thursday 29 December 2016

Favorites of 2016

Hey guys!

Today I have my favorite manicures of 2016 to share with you!

First up are these lead light leafs.
I really like this manicure and the lead light nail art technique in general. This picture is also one of my best nine of 2016 on Instagram.


Next I have this minimalistic manicure.
This was part of a mani swap, but I fell in love with the simple negative space manicure and it became one of my favorite manicures in 2016.


Next up are these cute donut nails.
This freehanded manicure is seriously adorable and just my style.


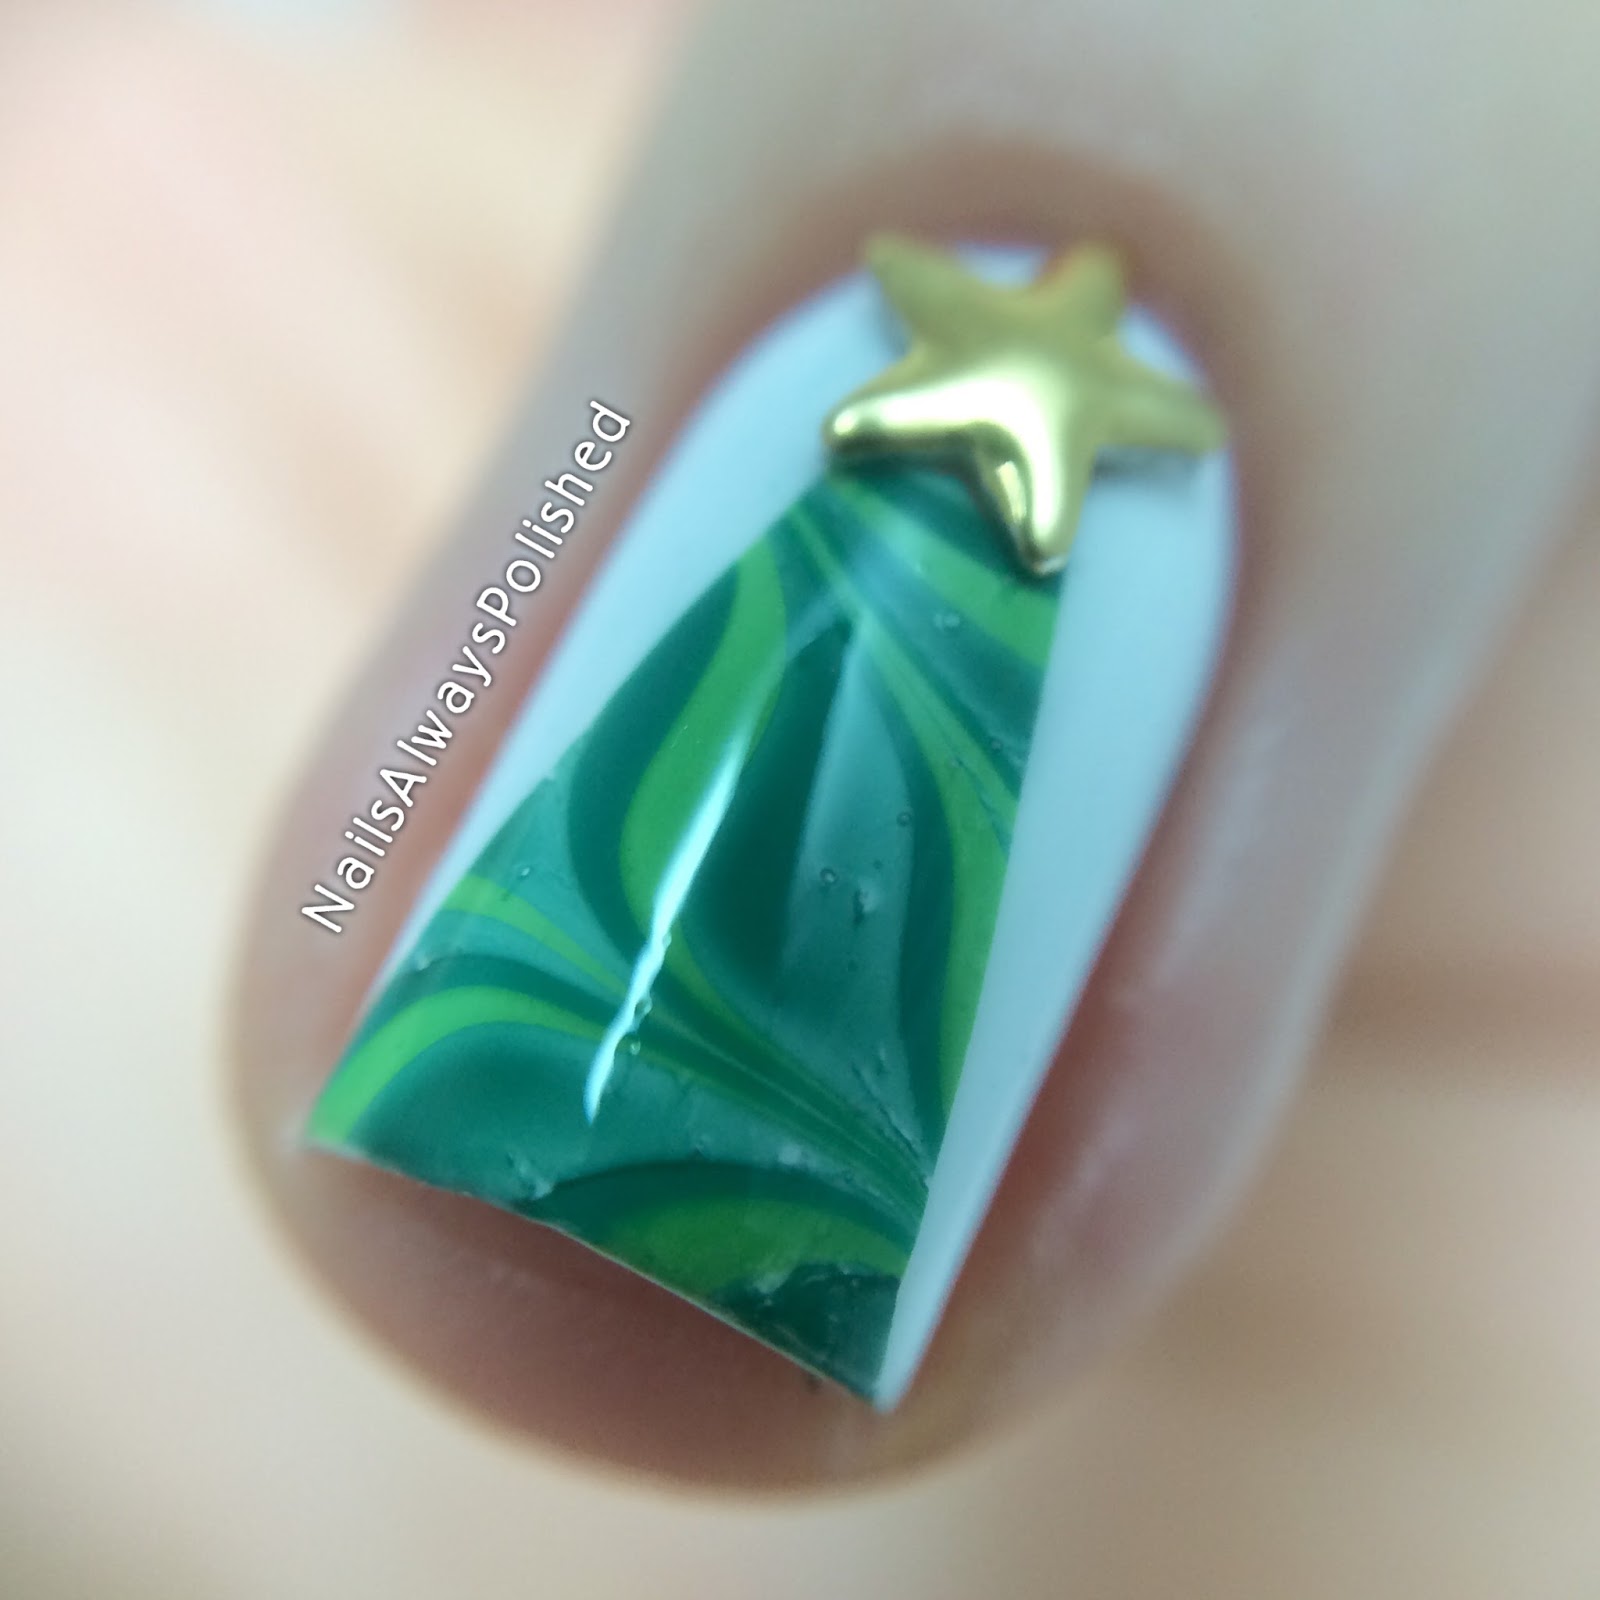
Another favorite manicure of 2016 is this Moroccan mani.
I love this sparkly skittlette! This year I definitely went all out on glitter - especially the beautiful F.U.N Lacquer glitters.


Next favorite of 2016 is this negative space manicure.
This year I fell in love with negative space nail art and used it in all sorts of ways and varieties. This manicure was one of my more popular ones as well.


Next up I have some more nail art I used a lot this year - leopard.
I really love this leopard manicure with a sparkly twist.


Another favorite this year is this freehanded manicure inspired by my favorite museum - ARoS in Aarhus.
This ARoS-inspired manicure was really popular among my friends in Aarhus and I really like how it turned out as well.


This year I really got into negative space accent nails and especially this one with striping tape.
This type of accent nail featuring negative space is seriously my favorite and I use it all the time.


Next up I have this snowflake manicure featuring another negative space accent nail.


Lastly (but not least) I have this Christmas manicure featuring Christmas presents.
This manicure was so popular this year and definitely one of my favorites as well.


And that's it - that's all my favorite manicures from this year.
What do you guys think about my favorite manicures of 2016? Let me know in the comments!

Stay polished.
- Louise

Saturday 24 December 2016

More Christmas Trees

Hey guys!

Today it is Christmas and I have my last Christmas nail art to share with you this year!

For the manicure I started off with a red base of Barry M Blood Orange on all my nails except for my pinky which I painted gold using Essie Getting Groovy. Then I created the Christmas trees on my middle and ring finger with striping tape and Essie Getting Groovy - and a dotting tool for the stars on top of the trees.


Close up!


Merry Christmas!
What do you guys think about this nail art? Let me know in the comments!

Stay polished.
- Louise

Thursday 22 December 2016

Santa Hats

Hey guys!

Today I have another Christmas manicure to share with you - little Santa hats inspired by Keshialilly!

For the manicure I started off with a red French tip of Essie Dress to Kilt on all my nails. Afterwards I used a dotting tool, a small nail art brush, white nail polish, and watered down black acrylic paint to create the Santa hat details.


Close up!


This is definitely one of my all time favourite Christmas nail art designs!
What do you guys think about this french manicure? Let me know in the comments!

Stay polished.
- Louise

Tuesday 20 December 2016

Rudolph Charm

Hey guys!

Today I have some more Christmas nail art to share with you featuring a Rudolph charm.

For the manicure I started off with a dark green base of Barry M Black Pistachio on all my nails (I left the top third of the nail naked on my ring finger). Afterwards I added the Rudolph charm to my ring finger.


Close up!


I got these Rudolph charms as a Christmas present from Milena of Nail That Design last year and I finally got the chance to use them!
What do you guys think about this Christmas manicure? Let me know in the comments!

Stay polished.
- Louise

Monday 19 December 2016

More Christmas Ornaments

Hey guys!

I recently shared this DIY project with you - Christmas ornaments made with nail polish.
Today I have some more ornaments to share with you!


To get started you need some plain glass ornaments and a lot of nail polish.
I found my glass ornament at the Danish hobby store Panduro.

When making these nail polish Christmas ornaments, I always start off by pouring some nail polish inside the ornament and turning it around until the entire inside of the ornament is covered. Then I decorate it on the outside of the ornament.


First up I have these Christmas trees.
I swirled around the red polish L'Oréal Exquisite Red on the inside of the ornament with a Q-tip to create the swirled effect. On the outside I applied cut out triangles of different green polishes to create the Christmas trees.


Next up I have this snowflake ornament.
I used China Glaze White on White on the inside of the ornament. On the outside I stamped the snowflakes with MoYou London Festive 02 stamping plate and Essie Penny Talk.


Next I have this cute snowmen ornament.
I created the same swirl effect as with the Christmas tree ornament using a Q-tip and the blue Barry M Blue Sky on the inside of the ornament. On the outside of the ornament I freehanded the snowmen with different colored polishes and a small nail art brush.


And here it is from another angle!


Lastly I have another Christmas tree ornament.
For this one I started off with the white glitter Dance Legend Dotty Top on the inside of the ornament. Then I freehanded the trees using the dark green polish Barry M Black Pistachio and the white polish Essence Wild White Ways on the outside of the ornament.

And that's it! What do you guys think about these nail polish Christmas ornaments!
Let me know in the comments!

Stay polished.
- Louise

Saturday 17 December 2016

Christmas Presents

Hey guys!

Today I have some more Christmas nail art to share with you - Christmas presents!
This is inspired by my own design from last year!

For the manicure I stamped different Christmas designs from the MoYou London Festive 06 plate in different colors. On the pointer I used the blue Deborah Lippmann Blue Orchid stamped with the silver Essie No Place Like Chrome, on my middle finger I used the red Essie Head Mistress stamped with the gold Essie Good as Gold, on my ring finger I used the green Deborah Lippmann She Drives Me Crazy stamped with the white Essence Wild White Ways, and on my pinky finger I used the white Essence Wild White Ways stamped with the red By K. Oy-Mak. To finish the present I used striping tape in different colors.


Close up!


This is seriously one of my favourite Christmas designs!
What do you guys think about this nail art? Let me know in the comments!

Stay polished.
- Louise

Thursday 15 December 2016

Glitter Gradient

Hey guys!

Today I have my entry for the @essienordics competition on Instagram to share with you!
This manicure is really special to me, because it is the exact manicure I wore to my high school prom (as you can see in this ancient blog post).

For the manicure I started off with a royal blue base of Essie Mezmerised on all my nails. Afterwards I applied the silver glitter Essie Set in Stones in a gradient design.


Close up!


What do you guys think about these shades and this manicure?
Let me know in the comments!

Stay polished.
- Louise

Wednesday 14 December 2016

Rudolph

Hey guys!

Today I have some cute Christmas nail art to share with you!

For the manicure I started off with the beautiful red polish piCture pOlish Bridget on all my nails, except for the ring finger which I painted blue with Deborah Lippmann Blue Orchid. Afterwards I freehanded Rudolph the Reindeer on my ring finger using a small nail art brush, the brown China Glaze Desert Sun, piCture pOlish Bridget (for the nose), Essie Partner in Crime (for the antlers), and white and black polish for the eyes.


I think this Christmas nail art turned out so cute!
What do you guys think about this Rudolph manicure? Let me know in the comments!

Stay polished.
- Louise

Sunday 11 December 2016

Christmas Trees

Hey guys!

Today I have some more simple christmas nail art to share with you - christmas trees inspired by @nailsbyjema!

For the manicure I started off with a white base of China Glaze White On White on all my nails. Afterwards I water marbled with the three green shades Essie Going Incognito, Essie Ruffles and Feathers, and Essie Mojito Madness. When the water marble was completely dry, I cut it out in triangles and applied it to my nails to resemble christmas trees. To finish everything off I applied a star stud on top of the trees.


Close up!


Even though this did not turn out perfect, I like it!
What do you guys think about this christmas tree nail art? Let me know in the comments!

Stay polished.
- Louise

Friday 9 December 2016

Candy Cane

Hey guys!

Today I have some simple christmas nail art to share with you!

For the manicure I started off with a white base of Essence Wild White Ways on all my nails. Afterwards I stamped in the candy cane design with MoYou London Festive 06 stamping plate and the textured, red polish OPI Magazine Cover Mouse - I also had to fill in the design with some more of OPI Magazine Cover Mouse to make it completely opaque.


Close up!


This did not turn out as I imagined it in my head.
What do you guys think about this christmas nail art? Let me know in the comments!

Stay polished.
- Louise

Monday 5 December 2016

Christmas Galaxy

Hey guys!

Today I have some awesome christmas galaxy nail art to share with you!

For the manicure I started off with a black base of Essie Licorice on all my nails. Afterwards I dapped on some white nail polish in the desired nebula shape across my nails and colored that in with the red polish Essie Really Red, the green Essie Going Incognito, and the gold/mint Il Était un Vernis Mint to Be Yours. Then I topped it off with the gold holographic glitter China Glaze Golden Enchantment and freehanded on some stars with white acrylic paint and a small nail art brush.


Close up!


I love how this turned out! I think it looks so awesome!
What do you guys think about this galaxy nail art? Let me know in the comments!

Stay polished.
- Louise

Friday 2 December 2016

Santa

Hey guys!

Today I have this cute Santa Claus nail art inspired by @nailsbyjema to share with you!

For the manicure I started off with a red base of Essie Really Red on all my nails. Afterwards I freehanded the Santa on my middle finger using a small nail art brush, piCture pOlish Beige for the face of Santa, Essence Wild White Ways for the beard, OPI Mod About You for the nose, and Essie Licorice for the eyes and mouth. Then I freehanded the Santa coat on my ring finger with the nail art brush, Essence Wild White Ways, Essie Licorice, and the gold polish Essie Good as Gold for the buckle.


Close up!


I think this design turned out adorable!
What do you guys think about this nail art? Let me know in the comments!

Stay polished.
- Louise

Christmas Ornaments

Hey guys!

Today I have a DIY project to share with you - christmas ornaments made with nail polish!
I also made some last year. You can check them out here.


To get started, you need some plain glass ornaments and a lot of nail polish.
I found my glass ornaments at the Danish hobby store Panduro.

When making these nail polish christmas ornaments, I always start off my pouring some nail polish inside the ornament and turning it around until the entire inside of the ornament is covered with nail polish.


First up is this bird house ornament inspired by MaineWeddingArtist on Etsy.
I used Appeal4 Frosty Dawn as the base (on the inside of the ornament). Afterwards I freehanded the branches, birds, bird house, and snowflakes with different colored nail polishes and a small nail art brush on the outside of the ornament.


Next up I have this snowflake ornament.
I used Essie Leading Lady on the inside of the ornament. Afterwards I stamped the snowflakes with MoYou London Festive 02 stamping plate and Essie As Good As Gold.


Next I have my favorite ornament this year - this cute Santa Claus in a chimney ornament.
I started off with a base of the white glitter polish Appeal4 Coconut Pine on the inside of the ornament. Afterwards I freehanded the chimneys and the two halves of the Santa with different colored nail polishes and a small nail art brush.


And here it is from behind!


Lastly I have this beautiful glitter ornament.
I started off with a white polish on the inside of the ornament. Then I made the glitter gradient using F.U.N Lacquer 24 Karat Diamond and afterwards I added the stones and adhered them onto the ornament with top coat.

And that's it! What do you guys think about these nail polish christmas ornaments?
Let me know in the comments!

Stay polished.
- Louise

Wednesday 30 November 2016

Essie Playing Koi

Hey guys!

Today I have a swatch and review of the beautiful fall color Essie Playing Koi.
Playing Koi is a burnt orange crelly.

The formula on this polish is good and easy to work with. It is a little on the thin side for my taste though, but I tend to like the formulas to be thicker. The opacity was good as well and I applied three thin coats. The dry time was amazing and I did not need to wait between the three coats.


I seriously think this is the perfect fall colour!
What do you guys think about this polish? Let me know in the comments!

Stay polished.
- Louise

Monday 28 November 2016

Triangle Swirl

Hey guys!

Today I have some simple nail art to share with you!

For the manicure I started off with a holographic silver glitter base of F.U.N Lacquer 24 Karat Diamond on my ring finger and pinky and with a pink base of Cirque Color Plastik on my other nails. Afterwards I applied a triangle swirl vinyl from Snail Vinyls to my ring finger and used Cirque Color Plastik to finish the look.


Close up!


What do you guys think about this nail art?
Let me know in the comments!

Stay polished.
- Louise

Saturday 26 November 2016

Snowflakes

Hey guys!

Today I have some simple stamping nail art featuring snowflakes to share with you!

For the manicure I started off with a dark blue base of Essence Royal Blue on all my nails. On my ring finger I created the negative space with a small brush dipped in acetone. Afterwards I added the bronze snowflakes using Essie Penny Talk and MoYou London Festive plate 02.


Close up!


I seriously love how these turned out!
What do you guys think about this stamping nail art?  Let me know in the comments!

Stay polished.
- Louise

Thursday 24 November 2016

Water Droplets

Hey guys!

Today I tried a new technique inspired by @simplynailogical - water droplets!
See it in action here!

For the manicure I started off with a duochrome base of Dance Legend Boggs on all my nails. Afterwards I mattified it with Essie Matte About You. Lastly I added the droplets using a dotting tool and a clear polish.


Close up!


I don't think it works as well with regular nail polish as with gel polish, but I think it turned out okay.
What do you guys think about this nail art? Let me know in the comments!

Stay polished.
- Louise

Monday 21 November 2016

Blobbicure

Hey guys!

Today I have a simple skittlette blobbicure to share with you!

For the manicure I started off with a pink base of OPI Mod About You on all my nail except for my pinky which I painted green with piCture pOlish Kryptonite. Afterwards I dotted piCture pOlish Kryptonite in the still wet polish on my middle and ring finger to create the blobbicure effect.


Close up!


What do you guys think about this nail art?
Let me know in the comments!

Stay polished.
- Louise